Membuat dan melakukan transpilasi terhadap backend kustom
# Added by doQumentation — required packages for this notebook
!pip install -q numpy qiskit rustworkx
# Don't use SVGs for this file because the images are too large,
# and the SVGs are much larger than their PNGs equivalents.
%config InlineBackend.figure_format='png'
Versi paket
Kode di halaman ini dikembangkan menggunakan persyaratan berikut. Kami merekomendasikan penggunaan versi ini atau yang lebih baru.
qiskit[all]~=2.5.2
Salah satu fitur Qiskit yang lebih canggih adalah kemampuannya mendukung konfigurasi perangkat yang unik. Qiskit dirancang agar tidak terikat pada penyedia perangkat keras kuantum yang kamu gunakan, dan para penyedia dapat mengonfigurasi objek BackendV2 sesuai properti perangkat mereka yang unik. Topik ini mendemonstrasikan cara mengonfigurasi backend kamu sendiri dan melakukan transpilasi sirkuit kuantum terhadapnya.
Kamu bisa membuat objek BackendV2 yang unik dengan geometri atau basis gate yang berbeda, lalu melakukan transpilasi sirkuit dengan mempertimbangkan konfigurasi tersebut. Contoh di bawah ini mencakup backend dengan kisi qubit yang tidak terhubung (disjoint), yang basis gate-nya berbeda antara tepi dan bagian dalam kisi.
Memahami antarmuka Provider, BackendV2, dan Target
Sebelum memulai, ada baiknya memahami kegunaan dan tujuan dari objek Provider, BackendV2, dan Target.
-
Jika kamu memiliki perangkat kuantum atau simulator yang ingin diintegrasikan ke Qiskit SDK, kamu perlu menulis kelas
Providersendiri. Kelas ini memiliki satu tujuan: mengambil objek backend yang kamu sediakan. Di sinilah semua tugas kredensial dan/atau autentikasi yang diperlukan ditangani. Setelah diinstansiasi, objek provider akan menyediakan daftar backend serta kemampuan untuk memperoleh/menginstansiasi backend. -
Selanjutnya, kelas backend menyediakan antarmuka antara Qiskit SDK dan perangkat keras atau simulator yang akan menjalankan Circuit. Kelas ini mencakup semua informasi yang diperlukan untuk mendeskripsikan backend ke Transpiler sehingga dapat mengoptimalkan Circuit sesuai batasannya.
BackendV2terdiri dari empat bagian utama:-
Properti
Target, yang berisi deskripsi batasan backend dan memberikan model backend untuk Transpiler -
Properti
max_circuitsyang mendefinisikan batas jumlah Circuit yang bisa dijalankan backend dalam satu job -
Metode
run()yang menerima pengiriman job -
Sekumpulan
_default_optionsuntuk mendefinisikan opsi yang dapat dikonfigurasi pengguna beserta nilai defaultnya
-
Membuat BackendV2 kustom
Objek BackendV2 adalah kelas abstrak yang digunakan untuk semua objek backend yang dibuat oleh provider (baik dalam qiskit.providers maupun pustaka lain seperti qiskit_ibm_runtime.IBMBackend). Seperti yang disebutkan di atas, objek-objek ini memiliki beberapa atribut, termasuk Target. Target berisi informasi yang menentukan atribut backend — seperti Coupling Map, daftar Instructions, dan lainnya — kepada Transpiler. Selain Target, kamu juga bisa mendefinisikan detail tingkat pulsa seperti DriveChannel atau ControlChannel.
Contoh berikut mendemonstrasikan kustomisasi ini dengan membuat backend multi-chip yang disimulasikan, di mana setiap chip memiliki konektivitas heavy-hex. Contoh ini menentukan set gate dua qubit backend menjadi CZGates di dalam setiap chip dan CXGates antar chip. Pertama, buat BackendV2 kamu sendiri dan sesuaikan Target-nya dengan gate satu dan dua qubit sesuai batasan yang telah dijelaskan sebelumnya.
Memplot coupling map memerlukan pustaka graphviz yang sudah terinstal.
import numpy as np
import rustworkx as rx

from qiskit.providers import BackendV2, Options
from qiskit.transpiler import Target, InstructionProperties
from qiskit.circuit.library import XGate, SXGate, RZGate, CZGate, ECRGate
from qiskit.circuit import Measure, Delay, Parameter, Reset
from qiskit import QuantumCircuit, transpile
from qiskit.visualization import plot_gate_map

class FakeLOCCBackend(BackendV2):
    """Fake multi chip backend."""

    def __init__(self, distance=3, number_of_chips=3):
        """Instantiate a new fake multi chip backend.

        Args:
            distance (int): The heavy hex code distance to use for each chips'
                coupling map. This number **must** be odd. The distance relates
                to the number of qubits by:
                :math:`n = \\frac{5d^2 - 2d - 1}{2}` where :math:`n` is the
                number of qubits and :math:`d` is the ``distance``
            number_of_chips (int): The number of chips to have in the multichip backend
                each chip will be a heavy hex graph of ``distance`` code distance.
        """
        super().__init__(name="Fake LOCC backend")
        # Create a heavy-hex graph using the
        # rustworkx library, then instantiate a new target
        self._graph = rx.generators.directed_heavy_hex_graph(
            distance, bidirectional=False
        )
        num_qubits = len(self._graph) * number_of_chips
        self._target = Target(
            "Fake multi-chip backend", num_qubits=num_qubits
        )

        # Generate instruction properties for single qubit gates and a measurement, delay,
        #  and reset operation to every qubit in the backend.
        rng = np.random.default_rng(seed=12345678942)
        rz_props = {}
        x_props = {}
        sx_props = {}
        measure_props = {}
        delay_props = {}

        # Add 1q gates. Globally use virtual rz, x, sx, and measure
        for i in range(num_qubits):
            qarg = (i,)
            rz_props[qarg] = InstructionProperties(error=0.0, duration=0.0)
            x_props[qarg] = InstructionProperties(
                error=rng.uniform(1e-6, 1e-4),
                duration=rng.uniform(1e-8, 9e-7),
            )
            sx_props[qarg] = InstructionProperties(
                error=rng.uniform(1e-6, 1e-4),
                duration=rng.uniform(1e-8, 9e-7),
            )
            measure_props[qarg] = InstructionProperties(
                error=rng.uniform(1e-3, 1e-1),
                duration=rng.uniform(1e-8, 9e-7),
            )
            delay_props[qarg] = None
        self._target.add_instruction(XGate(), x_props)
        self._target.add_instruction(SXGate(), sx_props)
        self._target.add_instruction(RZGate(Parameter("theta")), rz_props)
        self._target.add_instruction(Measure(), measure_props)
        self._target.add_instruction(Reset(), measure_props)

        self._target.add_instruction(Delay(Parameter("t")), delay_props)
        # Add chip local 2q gate which is CZ
        cz_props = {}
        for i in range(number_of_chips):
            for root_edge in self._graph.edge_list():
                offset = i * len(self._graph)
                edge = (root_edge[0] + offset, root_edge[1] + offset)
                cz_props[edge] = InstructionProperties(
                    error=rng.uniform(7e-4, 5e-3),
                    duration=rng.uniform(1e-8, 9e-7),
                )
        self._target.add_instruction(CZGate(), cz_props)

        cx_props = {}
        # Add interchip 2q gates which are ecr (effectively CX)
        # First determine which nodes to connect
        node_indices = self._graph.node_indices()
        edge_list = self._graph.edge_list()
        inter_chip_nodes = {}
        for node in node_indices:
            count = 0
            for edge in edge_list:
                if node == edge[0]:
                    count += 1
            if count == 1:
                inter_chip_nodes[node] = count
        # Create inter-chip ecr props
        cx_props = {}
        inter_chip_edges = list(inter_chip_nodes.keys())
        for i in range(1, number_of_chips):
            offset = i * len(self._graph)
            edge = (
                inter_chip_edges[1] + (len(self._graph) * (i - 1)),
                inter_chip_edges[0] + offset,
            )
            cx_props[edge] = InstructionProperties(
                error=rng.uniform(7e-4, 5e-3),
                duration=rng.uniform(1e-8, 9e-7),
            )

        self._target.add_instruction(ECRGate(), cx_props)

    @property
    def target(self):
        return self._target

    @property
    def max_circuits(self):
        return None

    @property
    def graph(self):
        return self._graph

    @classmethod
    def _default_options(cls):
        return Options(shots=1024)

    def run(self, circuit, **kwargs):
        raise NotImplementedError(
            "This backend does not contain a run method"
        )
Visualisasikan backend
Kamu bisa melihat graf konektivitas dari kelas baru ini dengan metode plot_gate_map() dari modul qiskit.visualization. Metode ini, bersama dengan plot_coupling_map() dan plot_circuit_layout(), adalah alat yang berguna untuk memvisualisasikan susunan qubit dalam sebuah Backend, serta bagaimana sebuah sirkuit ditata di atas qubit-Qubit Backend tersebut. Contoh ini membuat Backend yang terdiri dari tiga chip heavy-hex kecil. Contoh ini menentukan sekumpulan koordinat untuk mengatur posisi qubit, serta sekumpulan warna kustom untuk membedakan Gate dua-Qubit yang berbeda.
backend = FakeLOCCBackend(3, 3)

target = backend.target
coupling_map_backend = target.build_coupling_map()

coordinates = [
    (3, 1),
    (3, -1),
    (2, -2),
    (1, 1),
    (0, 0),
    (-1, -1),
    (-2, 2),
    (-3, 1),
    (-3, -1),
    (2, 1),
    (1, -1),
    (-1, 1),
    (-2, -1),
    (3, 0),
    (2, -1),
    (0, 1),
    (0, -1),
    (-2, 1),
    (-3, 0),
]

single_qubit_coordinates = []
total_qubit_coordinates = []

for coordinate in coordinates:
    total_qubit_coordinates.append(coordinate)

for coordinate in coordinates:
    total_qubit_coordinates.append(
        (-1 * coordinate[0] + 1, coordinate[1] + 4)
    )

for coordinate in coordinates:
    total_qubit_coordinates.append((coordinate[0], coordinate[1] + 8))

line_colors = ["#adaaab" for edge in coupling_map_backend.get_edges()]
ecr_edges = []

# Get tuples for the edges which have an ecr instruction attached
for instruction in target.instructions:
    if instruction[0].name == "ecr":
        ecr_edges.append(instruction[1])

for i, edge in enumerate(coupling_map_backend.get_edges()):
    if edge in ecr_edges:
        line_colors[i] = "#000000"
print(backend.name)
plot_gate_map(
    backend,
    plot_directed=True,
    qubit_coordinates=total_qubit_coordinates,
    line_color=line_colors,
)
Fake LOCC backend
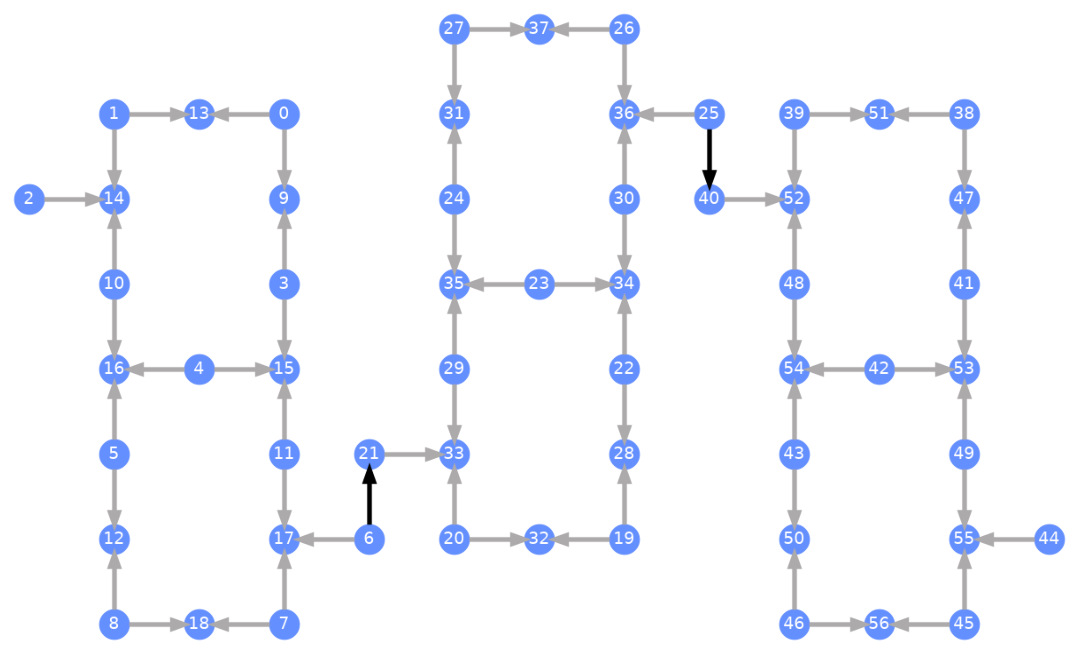
Setiap qubit diberi label, dan panah berwarna merepresentasikan Gate dua-Qubit. Panah abu-abu adalah Gate CZ dan panah hitam adalah Gate CX antar-chip (yang menghubungkan qubit dan ). Arah panah menunjukkan arah default di mana Gate-Gate ini dieksekusi; panah-panah tersebut menentukan qubit mana yang menjadi kontrol/target secara default untuk setiap kanal dua-Qubit.
Transpile terhadap Backend kustom
Setelah Backend kustom dengan Target uniknya sendiri sudah didefinisikan, cukup mudah untuk melakukan Transpile Circuit kuantum terhadap Backend ini, karena semua batasan yang relevan (Gate basis, konektivitas qubit, dan sebagainya) yang dibutuhkan oleh pass Transpiler sudah tersimpan dalam atribut ini. Contoh berikutnya membangun sebuah sirkuit yang membuat state GHZ berukuran besar dan melakukan Transpile terhadap Backend yang sudah dibuat di atas.
from qiskit.transpiler import generate_preset_pass_manager

num_qubits = 50
ghz = QuantumCircuit(num_qubits)
ghz.h(range(num_qubits))
ghz.cx(0, range(1, num_qubits))
op_counts = ghz.count_ops()

print("Pre-Transpilation: ")
print(f"CX gates: {op_counts['cx']}")
print(f"H gates: {op_counts['h']}")
print("\n", 30 * "#", "\n")

pm = generate_preset_pass_manager(optimization_level=3, backend=backend)
transpiled_ghz = pm.run(ghz)
op_counts = transpiled_ghz.count_ops()

print("Post-Transpilation: ")
print(f"CZ gates: {op_counts['cz']}")
print(f"ECR gates: {op_counts['ecr']}")
print(f"SX gates: {op_counts['sx']}")
print(f"RZ gates: {op_counts['rz']}")
Pre-Transpilation:
CX gates: 49
H gates: 50

 ##############################
Post-Transpilation:
CZ gates: 204
ECR gates: 8
SX gates: 374
RZ gates: 215
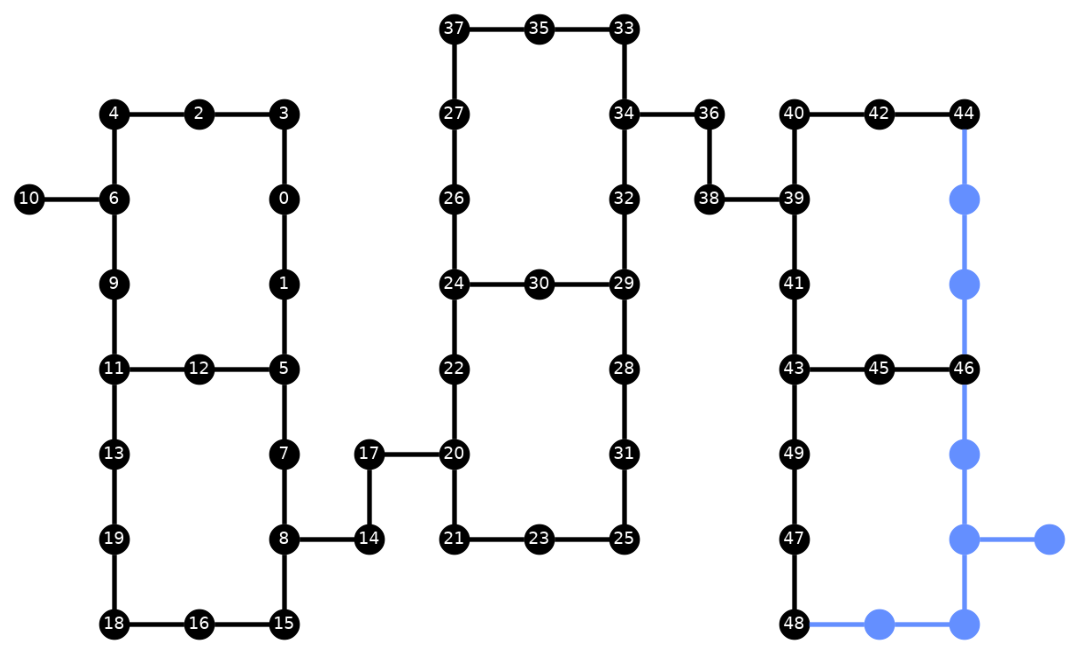
Circuit yang sudah di-Transpile sekarang mengandung campuran Gate CZ dan ECR, yang kita tentukan sebagai Gate basis dalam Target Backend. Ada juga jauh lebih banyak Gate dari sebelumnya karena perlunya menyisipkan instruksi SWAP setelah memilih layout. Di bawah ini, alat visualisasi plot_circuit_layout() digunakan untuk menentukan qubit dan kanal dua-Qubit mana yang dipakai dalam Circuit ini.
from qiskit.visualization import plot_circuit_layout

plot_circuit_layout(
    transpiled_ghz, backend, qubit_coordinates=total_qubit_coordinates
)
Buat Backend unik
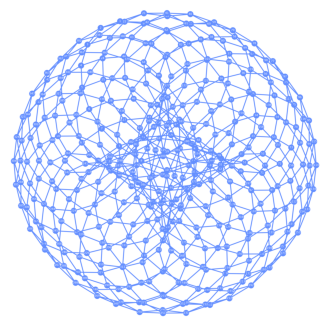
Paket rustworkx mengandung pustaka besar berbagai graf dan memungkinkan pembuatan graf kustom. Kode yang menarik secara visual di bawah ini membuat Backend yang terinspirasi dari toric code. Kamu kemudian bisa memvisualisasikan Backend tersebut menggunakan fungsi-fungsi dari bagian Visualize backends.
class FakeTorusBackend(BackendV2):
    """Fake multi chip backend."""

    def __init__(self):
        """Instantiate a new backend that is inspired by a toric code"""
        super().__init__(name="Fake LOCC backend")
        graph = rx.generators.directed_grid_graph(20, 20)
        for column in range(20):
            graph.add_edge(column, 19 * 20 + column, None)
        for row in range(20):
            graph.add_edge(row * 20, row * 20 + 19, None)
        num_qubits = len(graph)
        rng = np.random.default_rng(seed=12345678942)
        rz_props = {}
        x_props = {}
        sx_props = {}
        measure_props = {}
        delay_props = {}
        self._target = Target("Fake Kookaburra", num_qubits=num_qubits)
        # Add 1q gates. Globally use virtual rz, x, sx, and measure
        for i in range(num_qubits):
            qarg = (i,)
            rz_props[qarg] = InstructionProperties(error=0.0, duration=0.0)
            x_props[qarg] = InstructionProperties(
                error=rng.uniform(1e-6, 1e-4),
                duration=rng.uniform(1e-8, 9e-7),
            )
            sx_props[qarg] = InstructionProperties(
                error=rng.uniform(1e-6, 1e-4),
                duration=rng.uniform(1e-8, 9e-7),
            )
            measure_props[qarg] = InstructionProperties(
                error=rng.uniform(1e-3, 1e-1),
                duration=rng.uniform(1e-8, 9e-7),
            )
            delay_props[qarg] = None
        self._target.add_instruction(XGate(), x_props)
        self._target.add_instruction(SXGate(), sx_props)
        self._target.add_instruction(RZGate(Parameter("theta")), rz_props)
        self._target.add_instruction(Measure(), measure_props)
        self._target.add_instruction(Reset(), measure_props)
        self._target.add_instruction(Delay(Parameter("t")), delay_props)
        cz_props = {}
        for edge in graph.edge_list():
            cz_props[edge] = InstructionProperties(
                error=rng.uniform(7e-4, 5e-3),
                duration=rng.uniform(1e-8, 9e-7),
            )
        self._target.add_instruction(CZGate(), cz_props)

    @property
    def target(self):
        return self._target

    @property
    def max_circuits(self):
        return None

    @classmethod
    def _default_options(cls):
        return Options(shots=1024)

    def run(self, circuit, **kwargs):
        raise NotImplementedError("Lasciate ogne speranza, voi ch'intrate")
backend = FakeTorusBackend()
# We set `figsize` to a smaller size to make the documentation website faster
# to load. Normally, you do not need to set the argument.
plot_gate_map(backend, figsize=(4, 4))
num_qubits = int(backend.num_qubits / 2)
full_device_bv = QuantumCircuit(num_qubits, num_qubits - 1)
full_device_bv.x(num_qubits - 1)
full_device_bv.h(range(num_qubits))
full_device_bv.cx(range(num_qubits - 1), num_qubits - 1)
full_device_bv.h(range(num_qubits))
full_device_bv.measure(range(num_qubits - 1), range(num_qubits - 1))
tqc = transpile(full_device_bv, backend, optimization_level=3)
op_counts = tqc.count_ops()
print(f"CZ gates: {op_counts['cz']}")
print(f"X gates: {op_counts['x']}")
print(f"SX gates: {op_counts['sx']}")
print(f"RZ gates: {op_counts['rz']}")
CZ gates: 524
X gates: 4
SX gates: 1091
RZ gates: 1065